A journey though learning how to weave on a rigid heddle loom sharing tips and techniques, resources, and projects along the way!

Loom

Loom

Friday, February 9, 2018

FIRST WEAVE A HEADER

After you have tied your warp onto the front cloth beam and are ready to weave, before you start weaving with your project yarn, you need to do something about those triangular bundles of tied on warp that is pulling your warp to follow those triangles. To fix this, before you start weaving with your project weft yarn you need to weave a header. The header will straighten all of the warp from your heddle to your apron rod with the bundles tied on. Weaving a header is simple.

You will need something that is NOT your project yarn to do this. Any scrap yarn can be used. It is best that it is thicker than your warp yarn. Some have even used rolled toilet paper to weave a header. The header is going to be removed when your weaving COMES OFF THE LOOM so you want to use something that is going to be easy to get out. I use something called Mason Twine. This is a polycord that is used in construction to lay out brickwork or pavement. It is inexpensive. It can be found at home stores like Home Depot or Lowes. Any hardware store should sell this. Walmart sells this in the aisle near hardware that has rope. You get a lot on a roll.  It looks like this on the spool -


This is cord is slick. It slides easily and when it is time to pull it out, it just slides right out.  When you cut this cord it is best to seal the end so that it does not unravel. Just put the end of the cord near a flame for two seconds and it will start to melt. That's it. 

To measure how ,much you will need unwind the cord from the roll over your warp. Go across your warp eight times plus an extra inch or so each time to have enough cord. You now have enough cord to weave your header.

You are going to start about two or three inches above where your knots are on the warp beam. Adjust the tension on your warp to weave - same as if you were about to start weaving with your project yarn. 

With the mason twine I find it does not stay on a stick shuttle very easily, so I use the stick shuttle to push the yarn through the open shed using the slot of the shuttle to hold the yarn as it goes through. 

1. Open the shed. Take an end (doesn't matter which) of the header yarn or mason twine and push the end through the open shed to the other side with the end of a shuttle. Grab hold of the end as it comes through and pull it through. You want almost the entire length to come through the open shed. Leave a tail with the opposite end hanging out from the side you started on. Straighten the cord or yarn across inside the shed. Close the shed to neutral. DO NOT BEAT.

2. You are now on the other side of the warp with the long cord. Do as you did in STEP 1 going back the other way. Open the shed, push the end through getting most of the yarn out the other side. This time DO NOT pull the cord/yarn that goes over your warp end  to the other side so that it tightens against the end warp thread. Instead leave a loop hanging out. DO NOT BEAT.

3. Repeat STEP 2 twice more but with the fourth row of this header yarn. Here is what this will look like at this point - 


4. NOW you are going to BEAT all four rows at the same time.  If the first row does not move, don't worry about it. Make sure the other three rows get up against each other and MAKE SURE YOU HAVE A STRAIGHT LINE OF CORD/YARN ACROSS THE WARP.  You see below what this looks like now - and you can see that the warp yarns above this start of the header are coming to straight with even spacing. But not completely - yet!
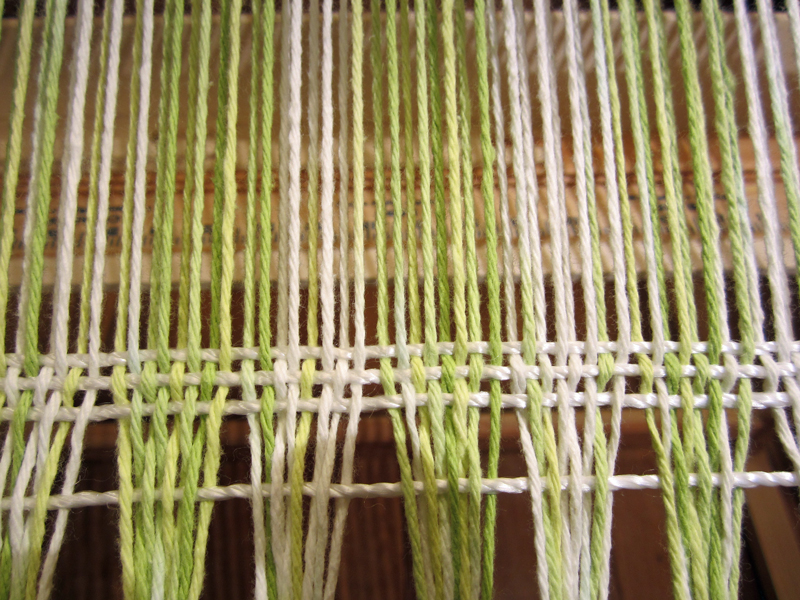


5. Now you should be on the same side you started on when you started your header. You are now going to start weaving with the header cord or yarn normally. 


I still leave a loop on the ends. I do not want the warp to be pulled in on the ends. I weave about four rows. Above you see the next row being put in - at an angle as you would do when you weave.

6. Keep weaving with your header cord/yarn until you see all of the warp nice and straight above the header to the heddle. I like to come back to the side I like to start to weave at. For me, I like to start on the right side of the warp with the heddle in the up position. If you start differently get your header yarn/cord to stop at the side you like to start weaving. If this means you have a lot of header cord/yarn left over, you can just leave it and it will wind up with the cloth or you can snip it off. Be very careful with scissors around your loom. You DON'T want to cut any warp threads. 


When you look above you see nice straight warp and even spacing. You are now ready to weave with your project yarn!

No matter what pattern you will be using for your weaving, start with a header first - no pattern - just plain weave.  If you don't weave a header you are going to find that your angled warp is going to make your beginning weave very uneven. 

When I start weaving after I weave my header, I move up a couple of inches from the header before I start weaving with my project weft. I do this to leave a space between the weft and the header so that when I hemstitch the end of the yarn on the loom (hemstitching article coming) the wrap will pull together in the hemstitch and allow for a nice tight stitch.


Some have other ways do create a header. Some use sticks that are woven into the warp. This can also work. For an rigid heddle loom, I have found that weaving a header as in this article is easy - and works every time.


Monday, November 6, 2017

DIY Bobbin Winder for Boat Shuttle Bobbins for Under $2 or Less!

A boat shuttle can be a fun accessory for a rigid heddle loom. They are used instead of the usual stick shuttle that comes with rigid heddle looms. With a rigid heddle loom they do have some drawbacks as they can only hold as much yarn as will fit on a bobbin and with the usual knitting yarns used by many to weave as weft on their rigid heddle looms they do not hold very much of that yarn and that means ending and starting a new bobbin frequently as you weave along with the many end and start ends you will have when your weaving comes off the loom. They are great, however, with thin yarns and you can get a good amount of finer yarns on a bobbin that will keep you weaving.

I am not going to go into buying a boat shuttle. One thing that you need to know before buying a boat shuttle is how large top to bottom is your open shed in either the up or down position of the heddle. The boat shuttle must fit through this opening with room to spare so that it will go from one side of the loom to the other as you weave. So before buying a boat shuttle measure the open shed and buy a boat shuttle that will easily fit and not be tight against the top and bottom of the shed as it passes through. There are several boat shuttles that will fit and one of the companies even makes a boat shuttle that they call "slim" that should fit a rigid heddle loom.

But once you have your boat shuttle you need to wind the weft yarn onto the shuttle's bobbin. This can be done by hand but while some do it, it is not practical. You would rather spend the time weaving. You want to wind the bobbin fast. There are manually cranked and electric motor winders sold - and they are expensive. But most have around the house a common tool that is perfect for winding a boat shuttle bobbin - an electric variable speed drill. Good for all kinds of projects around the house. And it is good for winding bobbins - but you need a secure way to get the bobbin onto the drill.

Here is a bobbin carrier that will cost you less than $2 at any home or hardware store. You will need:

1 six inch dome head screw bolt 1/4" in diameter
1 nut to fit bolt
1 small washer to fit bolt
2 larger washers to fit bolt


The bobbin for my boat shuttle is four inches long. The screw bolt is six inches long. This allows two inches to be tightened securely into the drill chuck. Boat shuttle bobbins can be different lengths. If your shuttle uses longer than a four inch long bobbin you would just need to get a screw bolt two inches longer than the bobbin length.  Also check the hole diameter in your bobbin. If it is wider than 1/4" then get a bolt that will just fit in - don't get a bolt that is much smaller than the hole in the bobbin. If you do, it will not wind evenly as it turns on the drill.

Here is how this will go together -


The small washer goes on first. This is to give a flat base to sit against the top of the screw. One of the large washer's goes on next. Then the bobbin is slid on. Next goes the second large washer goes on, Then put the nut on the bottom of the screw and tighten the nut against the washer to hold the bobbin securely on the bolt. Do not over tighten. Do not use any tool. Just turn the nut on with your fingers.

Put the end of the screw (not the dome end into the drill chuck and tighten the chuck. A variable speed drill will turn faster or slower by how much you hold the trigger in. You are going to start winding your yarn onto the bobbin SLOWLY.  First - with no yarn pull the trigger of the drill and see where you want to hold the trigger in to get a slow and steady wind. Also take note of the direction the drill is going. Most of these drills are also reversible so if you want it to turn the other way there will be a switch to do that. Take the end of your yarn and wrap it around catching the end under one of the hand wraps you do here at the top of the bobbin and make sure you are wrapping the same way the drill will turn. Now pull the trigger just a little and get the bobbin turning and you will have your yarn now winding on the bobbin.


 As it is winding hold your yarn with one hand while you hold and work the drill with the other. Move the yarn from top to bottom and back again along the bobbin as the drill turns and wind the yarn evenly along the bobbin. Once you have the wind going evenly you can squeeze the drill trigger harder and increase the speed - but don't get carried away! Once the yarn comes toward the top of the ends of the bobbin stop. Your bobbin is wound!


 This yarn is a #3 crochet cotton/wool blend. The thickest yarn I will use with the boat shuttle is a #1 knitting weight sock yarn. Anything thicker and I will go back to using a stick shuttle.


Cut the yarn between the screw and the ball. Take the screw out of the drill - just reverse how you turned the chuck to tighten it so that now you loosen it. Take the nut off the bolt, slide down the lower washer and slide off the bobbin. You are now ready to weave!

It is a good idea to buy a number of bobbins. They are often sold by the dozen. You can then wind all your needed bobbins for your project right at the start and have them ready to slide onto the shuttle when one ends.


It is easy. It works better than trying to chuck a pencil into a drill to hold a bobbin. (I tried that and was not happy with it.) And the price is right!

Monday, August 28, 2017

A Dowel Replacement on A Kromski Loom

Over time the tension on the warp may bend your dowel rods on your Kromski loom. This is not a big problem to deal with. Dowels are available in every home store and in some craft stores. There is nothing special about the dowels Kromski uses on their looms. They are hardwood dowels. You can use a bent apron rod BUT it is best to keep the distance from the rod to the heddle at an equal distance across. When I noticed the bend on one of my Kromski apron rod dowels after using it a few months, I went out to buy dowels to replace the bent dowel. I bought a same sized dowel - you will need to cut it to length - even a small hand saw can do this - and I decided to buy an OAK dowel. Oak dowels are slightly more expensive but worth having a harder wood.

Home stores should sell perfectly straight dowels - as they should sell perfectly straight lumber but that does not always happen. Take some time to find the straightest dowel the store has. Take it to a flat surface in the store - heavy oak plywood is often flat - and roll the dowel on the flat surface and see that that it rolls flat and does not bump up at any point along its length. It pays to take time to get a good straight dowel.

I thought that this was going to be final solution, but wood is wood and in humid areas and with tension being put on the dowels on the loom, even the best round dowel will eventually warp or bend. I looked at the apron rods that Ashford uses - they are not dowels. They are flat strips of wood. If used with the flat side UP - meaning the edge of the flat wood strip faces the heddle and not the larger flat surface of the wood. I went out and bought a 1/4" thick board in one of the Home Stores. These thin boards are considered "hobby" boards or wood. I cut a strip off of that board as wide as the dowel on my Kromski and I attached it with the existing TexSolv apron cords that I had put on (see the last article). It is very hard to bend a strip of wood along its edge.

I only replaced on dowel with this flat apron rod. The cloth beam apron rod Oak dowel that I replaced the Kromski dowel with has been fine so far. If it ever needs replacement, I have more of the flat board to make a flat apron rod for this side.


It works! It will require someone with a table saw to cut the strip of wood to the correct width and then the length needs to be cut the same length as the Kromski dowel.